Let’s look Grasshopper Apps’ Photo Touch Toys. When you play it as it comes, its a good little app. The settings allow you to select different levels and change the sounds, which for me makes it a great app. The fact that you can customize it and bring in your own photos makes it worth gold! This app could be used by any child who is working on, or generalizing receptive labels. So grab your shovel and let’s dig in!
First let’s get familiar with the settings. Tap the gear wheel in the top right corner.
 Sound – on/off, this turns all sounds on or off which would be helpful if the tutor will deliver all of the instructions and reinforcement
Display Hint – on/off, this turns on and off the textural prompt (word) at the top of the screen. I prefer it off to avoid prompting readers and to teach the user to listen to the directions. I do keep it on if I want to work on reading or for deaf students.
Min. items to display and Max. items to display. Use these two to set your field size. For example a FO3 (Field of three) would be set to min 3 and max 3, just as I have it here If you wanted to have a variable field of say 4-6 items then set min. to 4 and max to 6. The field can be as small as one and as large as ten.
Head back to the Settings menu. Skip down one to Customize Game Sounds. There is a nugget of gold here!
The error sound is a short two tone sound, nothing that should be considered fun and reinforcing. If you prefer having no feedback for an error then turn this sound off. If you use discrete trial teaching and prefer the feedback to be verbal then follow these steps:
To the right of Customize Error Sounds tap on the +
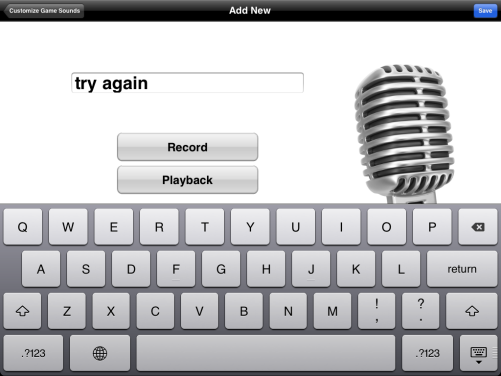
Tap on the box ‘Add description here’ and enter your description
 Tap ‘record’. Remember that the mic on an iPad is at the top near the camera. As soon as the ‘record’ button changes to say ‘stop’ it is recording. Record your voice and tap ‘stop’. I find it helpful to hover my finger above ‘stop’ so there isn’t any dead space at the end of my recording.
Use ‘playback’ to hear what you have recorded. When you are happy with it tap ‘save’ in the top right corner.
Your recording now appears on the list of error sounds. If you want to have several error sounds repeat the process; the error sounds will be used randomly when playing.

Last step, delete unwanted sounds.
- Tap ‘Delete’. The red minus signs will appear to the left.
- Tap the red minus. The red ‘delete’ button appears.
- Tap ‘delete’.
- When finished tap ‘done’
The same process can be done with the success sound. I can see this being incredibly beneficial for some students. Imagine having your child’s favourite person saying the reinforcement. Maybe a silly sound or part of a song or their favourite character speaking – the possibilities are endless! Plus anything that isn’t reinforcing can be deleted.

Now that the app is set up to run the way your child needs, lets take a look at the Library. As I mentioned it comes with a stock pile of photos, but you may not want to target them all at once, or perhaps your child finds the play dough photo difficult to recognize. To choose the items go into the Settings and tap Customize items
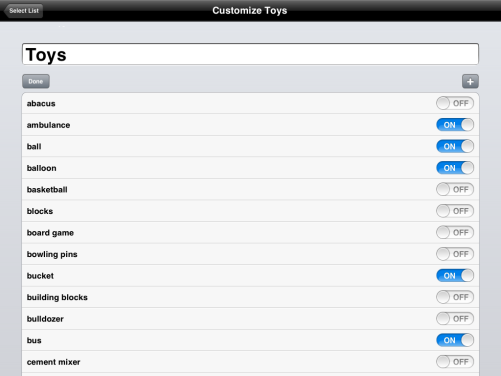
- Tap on the category ‘Toys’
- Tap the ‘on/off’ button.
- On the right hand side tap ‘on’ to slide it to the off position (or vise vera). Now only the items that are on will be used when playing.
- When finished tap done.
In the toy library you can add photos, however we are going to look at how to do this in a new library, perfect for adding all of your child’s receptive labels.
Creating a new library category
Go back to ‘Customize items’ either from the settings menu or if you were following along with us, use the top left arrow to ‘select list’.
Just like we did when adding a sound tap on the ‘+’. Name your list by tapping where it says ‘Add list name here’. I named my category “labels”
To add your own labels tap the ‘+’ to the right side of the screen. This will take you to a new screen to Add New Items.
As before tap the top box ‘Add description here’ this is the label that will appear on list but also on the screen if you have the ‘Display Hint’ turned on.
Next tap the large square ‘add photo’ and the pop up will allow you to ‘Take New Photo’ using your iPad camera (front or back) or ‘Choose Existing’ from your photo library. When selecting or taking a photo have the desired image a bit further away, not too close up – you’ll see why next.
When you choose a photo the image will appear in the middle of the box. Use your thumb and index finger to pull apart and zoom out. Once the image is large enough you can move it. Look for the thin lines on the top and bottom and be sure for image is at least to those lines so that it will be a uniform size throughout your library. Once you are done tap ‘use’. If you need to change it tap on the photo and you go throughout the process again.

Last step is to record the audio for the label, just as you did with the error and success sounds. Remember to tap ‘save’ in the right top corner when you are done!
You will notice on the list an item labeled ‘New’ to delete this or another image tap on the item in the list and use the Delete button on the button of the screen, confirm that you want to delete it. Last select library, then you’re done!!
We used some images from a Google image search. To learn how to add them to your iPad library (without the computer) read ‘Add Google Images’


